Announcements
New releases are here! Check out our new features and enhancements.
Coronavirus Update: 3/13/20
The memberplanet support team is continuing to serve customers through all regular channels. We do not expect the current coronavirus (COVID-19) outbreak to have a major impact on our products and services, however you may experience slightly longer call times. Thank you for your understanding and your continued partnership.
Release: 4/9/20
Set up text message notifications for payment forms
Now whenever someone submits a payment form, administrators can be alerted immediately by setting up a notification via SMS text message. This is especially convenient since most people carry a mobile device wherever they go, and about 90 percent of text messages are read within three minutes! In your admin portal, select Payment Forms, then click Manage Payment Form. Select the payment form you wish to receive alerts for. In the dashboard, click Text Message Notification. Enter the phone number without any dashes or special characters, then click Save. Learn more: Manage Payment Form Alerts.

Release: 3/12/20
New member statuses definitions and database headers
We’ve made our database easier to navigate! Our member statuses define what members can do in your group and where they are in the join process. The definitions are clearly listed in the platform database along with column headers, so you and your admins can gain an understanding of how these affect the way that members interact with your group. The actions you have available in the database are also contingent on the member status. In your admin portal, click members in the left navigation sidebar. Your members will be displayed. Hover over the question mark next to the Status header and the member status definitions will appear. Learn more: Manage Your Member Database.

New member join process lets admins customize confirmation page
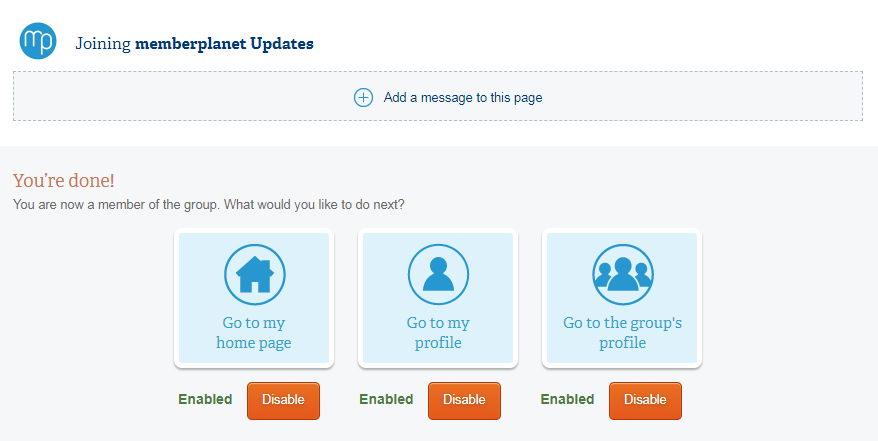
Admins can now customize the confirmation page to disable default links or include a link of their choice on the confirmation page that is displayed when a new member completes the group’s online join process. By default, the following links are included on the confirmation message: home page (member dashboard), member’s profile, and the group’s profile page (group site on memberplanet). An admin can disable all three and include a custom message and link. To customize, click Membership in the left navigation sidebar. On the dashboard, select Add Custom Content to New Member Pages. The join process will be displayed in preview mode. Navigate to the last page of the preview. Click to disable any of the default links and/or add a custom message to the page. View documentation of the full process: Customize the Join Process.
Sample confirmation page in preview mode:
Excel file download updated
We’ve updated the downloadable Excel file format to ensure compatibility with all up-to-date versions of Excel. Whether you’re downloading your member database or any type of in-platform report as an Excel file, you can rest assured that the file is safe and secure.
Release: 1/28/20
Updated membership levels report lets admins set auto or manual renewal
Admins can now easily view which of their members are on automatic or manual renewal from the membership levels report. They can also enable or disable auto renewal from the same report. If a member contacts your organization to request a change, an admin can quickly take care of it from the admin portal rather than walking the member through steps on how to do it from the member portal. Learn more about the membership levels report.
Send Broadcast emails with simple formatting
When you need to send a short announcement via text message and or email, brevity is usually of concern for both the sender and the reader. Our Broadcast email functionality has been enhanced so that simple text formatting, such as a hard return, is retained. One example is sending an updated mailing address. In an email, hard returns will display where intended, whereas in an SMS text message, the user will still see a string of text.
Example of a Broadcast Email:
Please note that the updated address for our membership meeting is:
1234 Blue St.,
City, CA 12345
Learn more about Broadcast functionality and sending a message via text and/or email simultaneously.
Survey & payment forms can pre-fill user’s address
Members and users who’ve filled out their physical address in their profile will now have one less field to fill out on surveys and payment forms. Once logged in, their address will pre-fill on forms, making it a faster checkout or completion process with less room for error. Admins can utilize pre-filled forms on surveys, payment forms, and donation campaigns.
Release: 8/26/19
Easily assign and activate administrative users in your group
A full-access administrative user can assign any number of admins and activate their accounts utilizing a more simplified process. After assigning a member of your group to an admin role, the new admin must activate the account. The admin who is assigning the role can send the activation email with a click of a button. The new admin simply needs to access the email and click the Claim Account button to be given access to the admin portal. Learn more about creating and assigning admin roles.
Bank verification enhancements
The bank verification process to collect funds on the platform has been updated to allow for less user errors and secure document upload. The admin user who is adding a new bank account will need to enter routing and account numbers twice to confirm the entry. A copy of a valid government-issued ID is required to complete banking verification. The document can be uploaded to the platform as a PNG, JPG, or PDF format. View documentation of the full process: How to Add and Verify Your Bank Account.
Release: 3/7/19
Display fundraisers who create a donation site in support of your campaign
Now there’s a great way to visualize a donation campaign’s fundraisers and how much they’ve contributed. Fundraisers, or supporters who create a donation site in support of a donation campaign, can be displayed in a pie chart on the main page. For those campaigns that leverage the spirit of competition, this front-and-center statistical graphic indicates those who are leading in donations. Users can also hover over the pie chart to see the fundraiser associated with each slice. Learn more: How to Add the Fundraisers Pie Chart.
New Text-to-Give feature provides another channel for donations
Take advantage of another channel to promote your donation campaign. Organizations that have a custom mobile number can now associate keywords with links to a donation campaign. When users SMS text a keyword associated with the campaign to your group’s custom mobile number, they will automatically receive a link to your associated donation campaign. Clicking the link will take a user directly to the mobile-friendly donation site, wherein they can donate online from any device. You can link multiple keywords in the instance that you’ve set up fundraiser or supporter pages. Anyone who misspells a keyword will still automatically receive a link to the main donation campaign. This feature is currently available to those on Enterprise plans and requires setup by our in-house support team. Please email support@memberplanet.com for more information.
Profile update email history includes date of profile update
Admins can utilize the profile update request to email members to update their profiles – and members can make updates using a tokenized link in the email without having to log in. Admins can then check whether members updated their profile and further target or take action for those who did not. The email history includes how many people the profile update request was sent to, whether the email was delivered and opened, and whether or not the profile was updated from the link. If a member did update his or her profile, the date is included. Learn more about profile update requests.
Membership card link included in member’s renewal confirmation email
We’ve made the membership card available to access once a member renews membership. If your organization uses the membership card feature, once a member renews, the confirmation email will include a tokenized link to access the member card. Clicking the link will open a new page with the member card and another link to download as a PDF. Learn more about accessing membership cards.
Q4 2018 Year-end Tech Updates
We're starting off 2019 with a jam-packed list full of great new features. In response to your feedback and support throughout 2018, five new updates have been released to the platform to better meet the ever-changing needs of our beloved groups. Just like you, we're dynamic too.
Introducing...
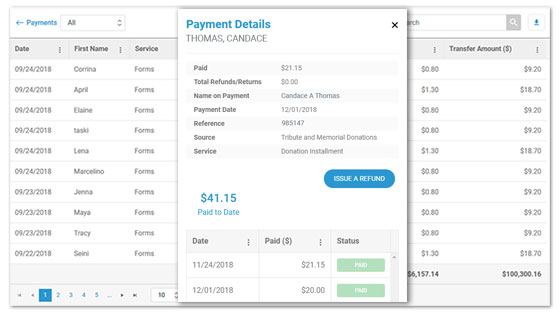
The all-new All Payments report has an updated look and feel that makes it cleaner and more user friendly. The report provides administrators with a bird’s-eye view of their organization and more detailed way to manage transaction-level data. Admins can easily view and manipulate data – without having to export to Excel (which you can still do, of course). If your organization has child groups, such as chapters or clubs, you can also see and sort transactions from your child groups in the same report. This report and its features are available on all subscription plans.
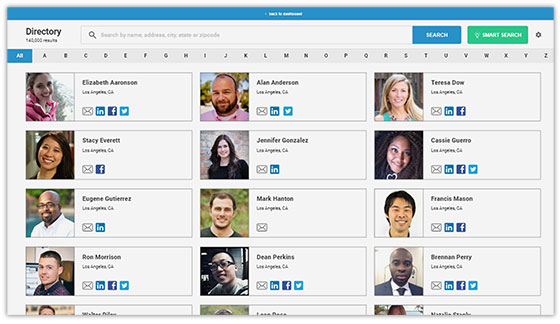
Our most recent update to the member directory features a full library of your organization’s members, their profiles, and their personalized information. Each member’s data is only accessible by your group, and displayed information settings are controlled by individual privacy settings. Request that members showcase their education, career, member level, or group title on their profile, or alternatively allow them to maintain the mystery with as little disclosure possible.
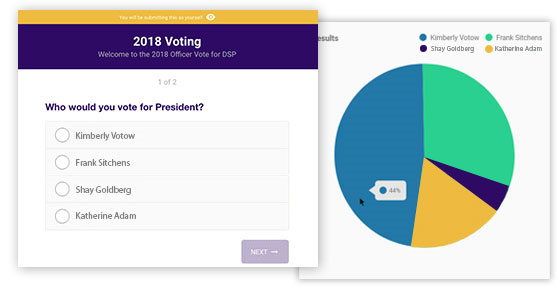
Our new polls tool is useful to all organizations by allowing them to facilitate secure, professional voting for officer elections, awards, or other ballot and election-oriented tasks. We offer much more customization and useful features – such as the ability to include more than one question – than polls on social media. Administrators have the flexibility to customize who is qualified to take a poll, start and end times to access the poll, as well as the data displayed in real-time results.
The memberplanet participation tracker provides administrators a transparent and accountable way to record or award credit (or points, hours, or any other type of format) to members for their involvement in your activities, such as attending an event, completing study hours, or volunteering their time. This is an excellent tool to recognize and reward active members, monitor overall event attendance or track volunteer hours, and learn which activities are actively engaging your members.
![]()
Events Check-in and RSVP Updates
Get a headcount ahead of time, generate event buzz by letting guests see who else has RSVP’d, and send tailored messages targeting people on your guest list based on their RSVP response. It’s a great way to promote online event registration and increase operational visibility on the days leading up to your event. Our recent fix includes an option to verify whether the person’s name matches the name on the invite. If it doesn’t, they can log in with their own credentials and continue to RSVP.
2018 was a year full of growth for us; we'll be helping you do the same all 2019. Tell us what you think of our platform, how we can improve our features, or simply say hello at support@memberplanet.com. Let's grow together this year.
Release: 11/15/18
Facilitate secure voting for your organization with the new polls feature
Our new polls tool is useful to all organizations by allowing them to facilitate secure, professional voting for officer elections, awards, or other ballot and election-oriented tasks. We offer much more customization and useful features – such as the ability to include more than one question – than polls on social media. Administrators have the flexibility to customize who is qualified to take a poll, start and end times to access the poll, as well as the data displayed in real-time results. Learn more and view the full polls documentation.
All Payments report automatically saves the column selections and order
An All Payments report enhancement automatically saves column settings for easier viewing. When viewing all payments, your selection of columns and column order adjustments will be saved. After selecting/deselecting columns or re-ordering columns, a message will briefly appear at the bottom of your browser as a confirmation that your settings have been saved. The next time you view the All Payments report, your saved column settings will apply. Learn more about the All Payments report.
Release: 9/27/18
Record and track member involvement with the new participation tracker feature
Participation tracker provides administrators a transparent and accountable way to record or award credit (or points, hours, or any other type of format) to members for their involvement in your organization’s activities, such as attending an event, completing study hours, or volunteering their time. Data is securely recorded by date and time in a customizable reporting format. You’ll be able to see who received credits and which admin awarded participation, as well as make any edits without navigating away from the report. Learn more and view the full participation tracker documentation.
New event check-in feature records accurate attendance
Administrators can enable event check-in to record attendance on the actual day of an event or activity, such as a community outreach, weekly membership meeting, or a study session. Admins can record a check-in by requiring members to use a system-generated passcode or manually checking in attendees. Admins can also customize the start and end times of the check-in window and edit the check-in status of a member. When linked to a participation tracker, admins can award members credits (or points, hours, or any other type of unit) for their check-in. Learn more: How to Enable the Event Check-in Feature.
Event RSVP enhancement allows members to share their invites
Sometimes guests forward their personalized event invite to their friends. To avoid confusion in reporting when someone RSVPs, an option was added to verify whether the person’s name on the invite matches the person who’s RSVPing. If it doesn’t, the user can log in with their own credentials and continue to RSVP. Learn more about enabling and sharing RSVPs.
Payment option to pay with bank account now available to users
Our integration with Plaid, a financial technology company, gives users an additional option to easily and securely link a bank account to make a payment. From any type of payment form on memberplanet, when the Pay with Bank option is selected, the user can search for their bank or add their bank manually by following on-screen prompts for a seamless consumer experience.
Release: 7/26/18
View and manage all transaction-level data with All Payments report
The improved All Payments report has the following upgrades:
- Powerful search options to search every field displayed
- Accounting summaries and filtering by payment type
- Pop-out screens to show status, payment details, schedule, or issue a refund
- Calculated totals for transaction data for date range selected
- Improved date range search with default to any time (all-time range from start of collecting funds on memberplanet) setting
- Quick filters to display payment activity by type of payment (installment or recurring) or memberplanet service, such as events, donations, membership and more
- Configurable view to lock columns when scrolling horizontally, hide columns, and sort by column data
- Access to transaction data from child groups
- Separate view of transaction data for your organization (at national or headquarters level)
Learn more about viewing your organization’s transaction reports.
Advanced search options let members search every field in the directory
The new Smart Search feature enhances the member directory and makes it easier for members to find other members by searching any field of data your organization collects. Through the interactive directory, you can give your members networking and mentorship opportunities, foster an online community, and improve engagement. Robust search functionality include returning partial and exact matches, as well as the ability to search custom field data, such as similar interests. Learn more about using Smart Search in the directory.